
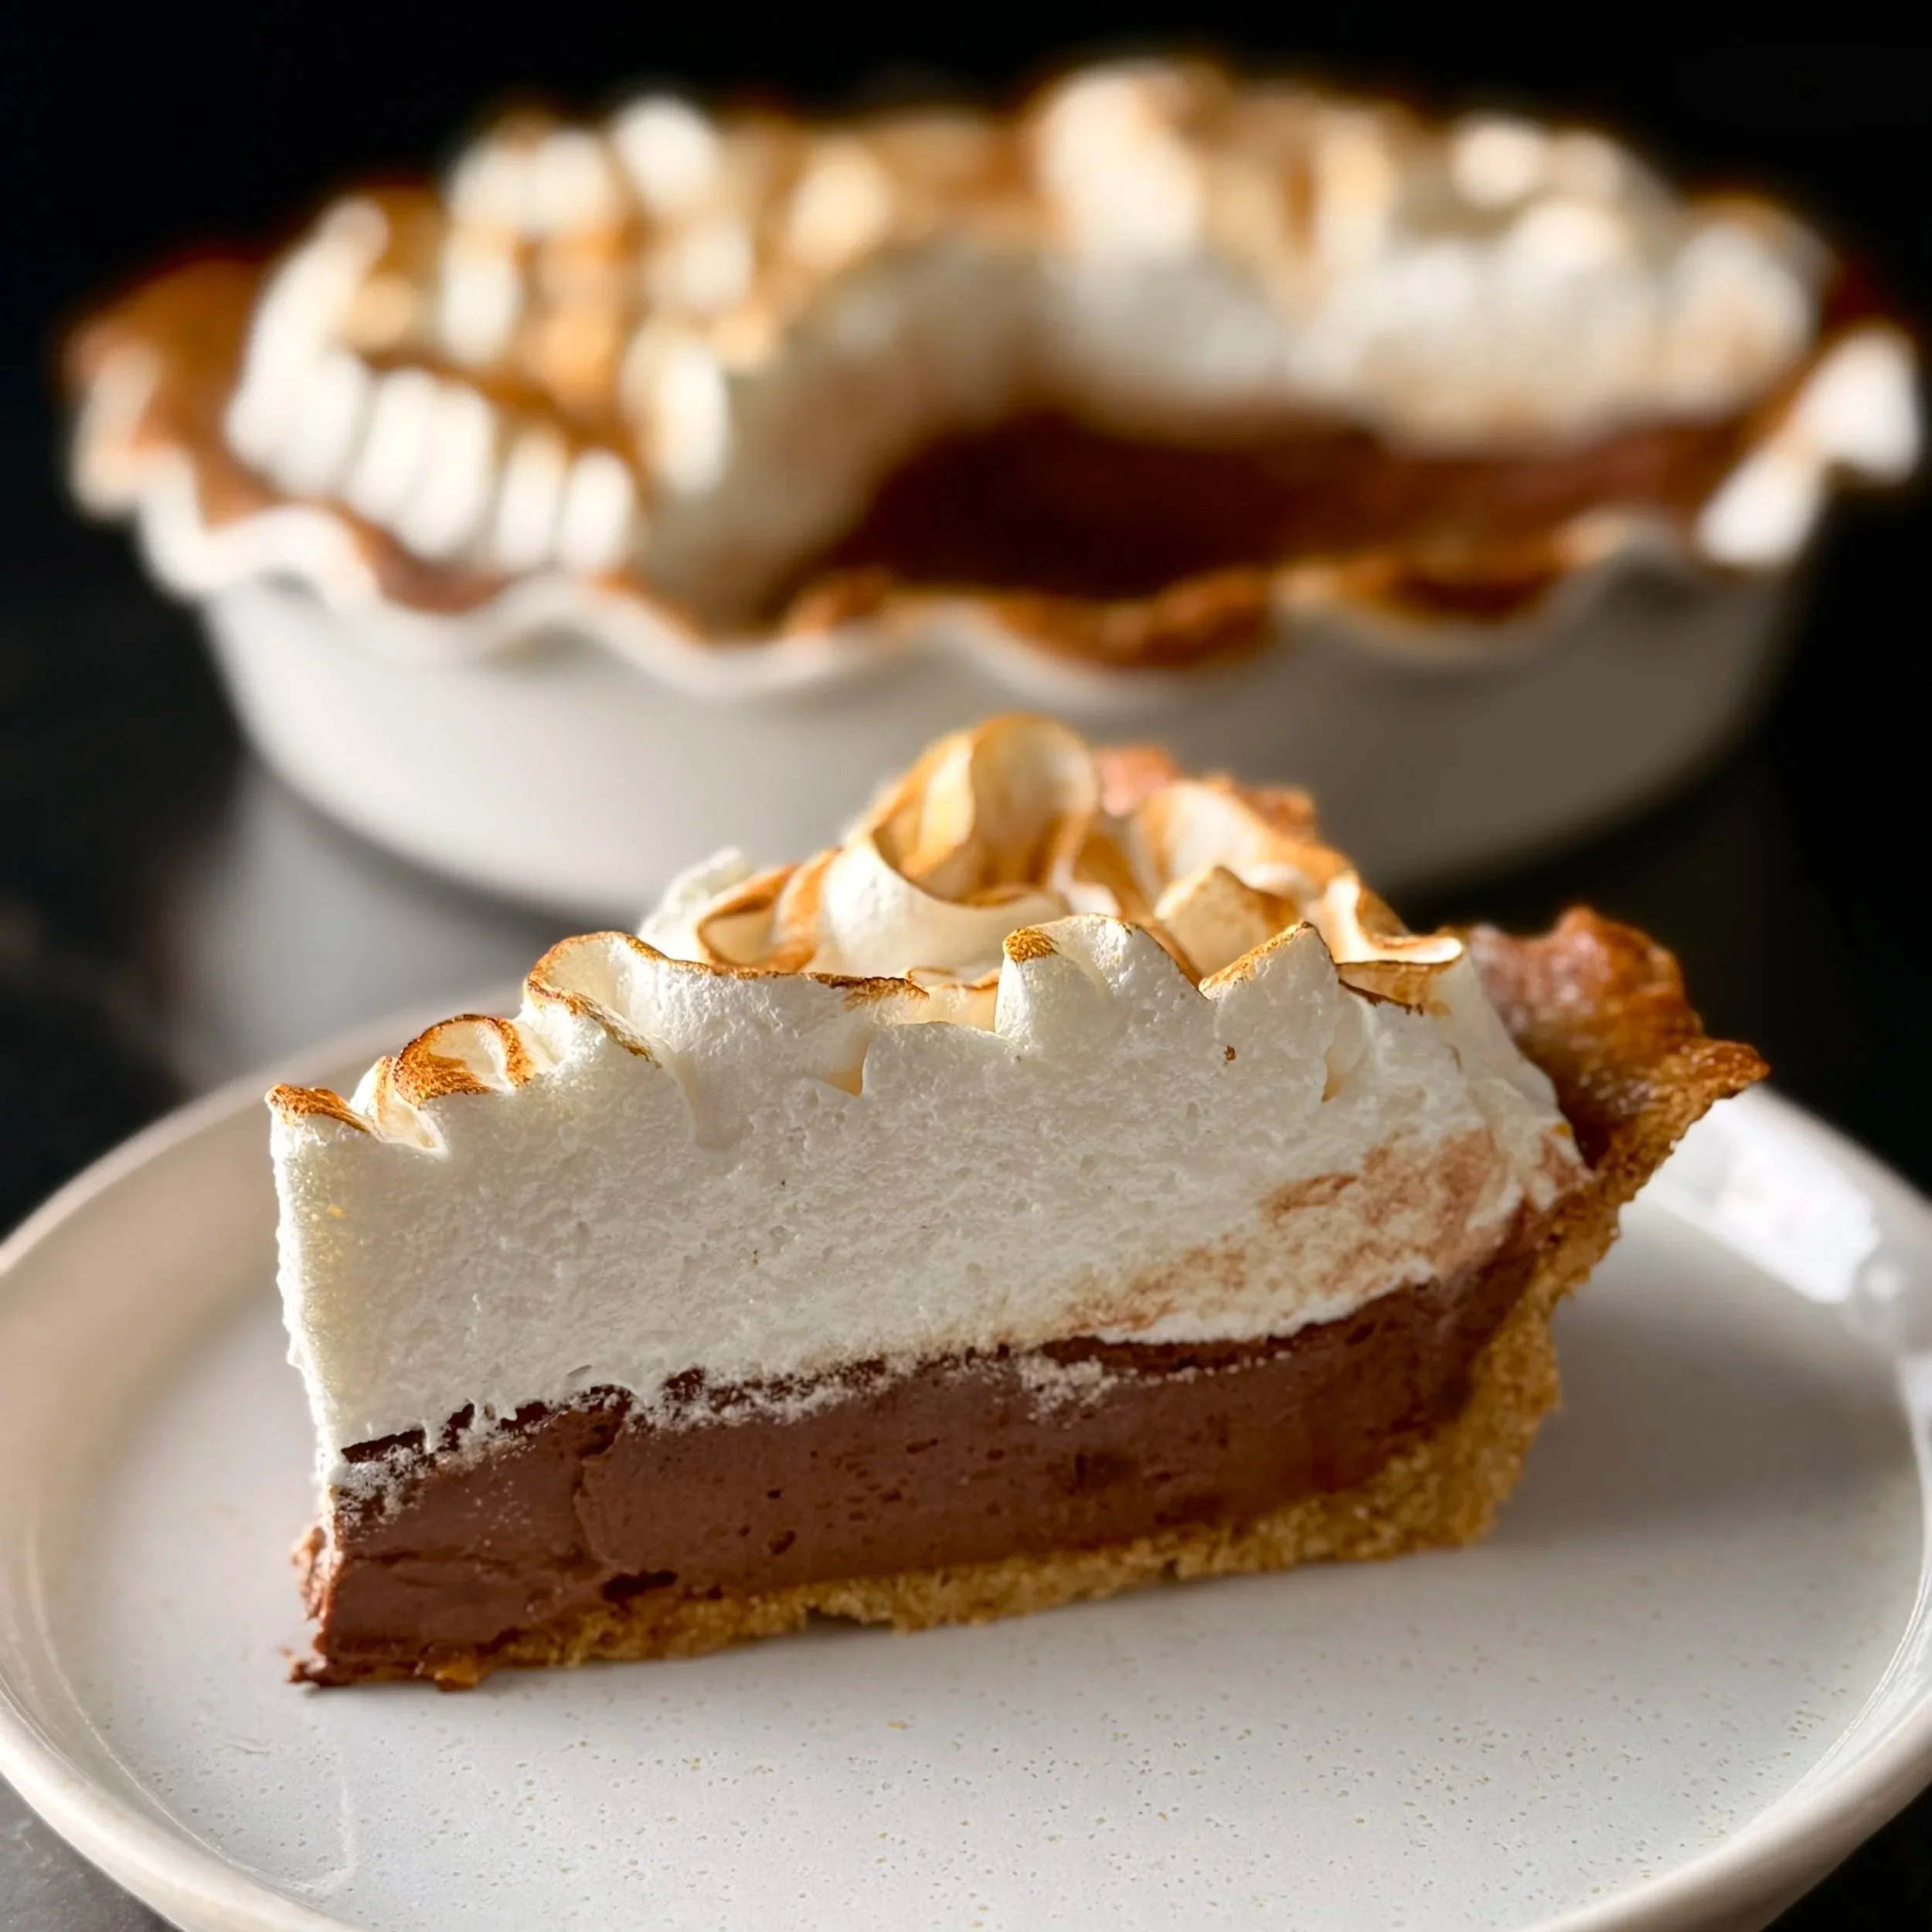
CHOCOLATE SILK PIE WITH MASA HARINA CRUST AND ITALIAN MERINGUE
Notes: Just by looking at this pie you know it’s going to hit all the taste buds in the right way. The chocolate silk filling has a deep chocolate flavor and a mousse-like consistency, thanks to egg yolks and cream. And why a masa harina crust? Masa harina is alkalized (nixtamalized) corn meal that has a much deeper, earthier flavor than regular corn meal and is traditionally used to make corn tortillas. The alkalization process breaks down the kernel proteins which allows masa harina to stick to itself (unlike regular corn meal) when water is added. This means that it will form a rather sticky dough and the stickiness is not an issue when making tortillas because you just add more masa harina, or flour until it’s no longer sticky. But if we add too much masa harina or flour here it throws off the flavors and makes the crust dry, which is definitely not what we want. I want a pie crust that is super tender and flavorful, and most pie crusts miss the mark because they’re mainly just flour and butter and often too dry. So I keep this pie crust sticky and to deal with the stickiness I roll it in between two sheets of parchment paper and freeze it for a few mins (or refrigerate) if it gets too soft. Corn flavor aside, this crust is also made with brown sugar and it ends up with a texture akin to a graham cracker crust, but it adheres better to itself and has even more flavor, yum! And finally the Italian meringue to top it off. You may think that Italian meringue is challenging if you’ve never made it, but you just need to get the sugar syrup to the right temperature (by actually measuring it) and have the egg whites ready to go as soon as the syrup comes to temperature, and the rest is just beating.
The recipe uses 5 eggs: 4 eggs are split between yolks and whites where the yolks are used for the chocolate silk filling and the whites are used for the Italian meringue. And one more egg is beaten and used as an egg wash for the pie crust.
Ingredients, where noted in grams, were weighed. A good kitchen scale with accuracy and precision at lower weights is a must for baking these days. This scale is the one I have and use (not sponsored), and at about $50 it’s a great investment: OXO Good Grips 11-Pound Stainless Steel Kitchen Scale with Pull-Out Display
Time: ~3 hours
Special Equipment:
Stand mixer or electric hand mixer
9 inch ceramic or glass pie plate
Medium sauce pan
Candy thermometer or infrared temperature gun
Pastry cutter or forks
Rolling pin
Fine mesh sieve
Offset spatula (optional)
Small blow torch (optional)
If you want a reliable, easy to use blow torch on the cheap, linked below is the one I have and use at about $15 (not sponsored).
Mini Blow Torch with Lock, Adjustable Flame, Refillable
Butane is not included; you can buy it at any smoke shop in little canisters.
Ingredients:
Masa harina crust:
130 g AP flour
60 g yellow masa harina
1/2 teaspoon pink or kosher salt
60 g brown sugar
1 teaspoon ground cinnamon
170 g (or 1 and 1/2 sticks) cold butter, cubed
1-2 tablespoons ice cold water
1 egg, beaten
Chocolate silk filling:
4 large egg yolks
50 g granulated sugar
473 mL (1 pint) heavy cream
1/2 teaspoon kosher or pink salt
2 teaspoons vanilla extract
128 g (7.5 oz) of a good dark chocolate (I recommend 70% dark)
Italian Meringue:
120 g (~4) egg whites, room temperature
180 g granulated or caster sugar
45 g water
pinch of salt
Directions:
Masa harina crust:
Combine dry ingredients. In a large bowl, whisk together the AP flour, masa harina, sugar, cinnamon and salt.
Add the cold butter. Drop the cubed butter into the flour mixture. Using your fingertips or a pastry blender, quickly cut the butter into the flour until the mixture resembles coarse, wet sand with some larger, pea-sized pieces of butter remaining. Visible specks of butter are key for flaky layers.
Add water as needed. Start with 1 tablespoon ice cold water and add up to 1 more tablespoon,as needed, after a rough mix. Stir with a fork just until the dough starts to come together. Finish pressing the dough together with your hands. Gloved hands are preferable so you don’t melt the butter too quickly. Wrap in plastic wrap and place in the fridge for 10-15 mins.
Roll the chilled dough into a 12-inch circle. Remove the plastic wrap and place the ball of dough between two sheets of parchment paper and flatten so it’s about a 1/2 inch thick then roll out to a rough 12 inch circle. Pull off one sheet and flip the exposed side over onto your pie plate. This crust is delicate and will likely tear when you transfer it, but you can just patch and reseal the tears with your fingers. Remove any excess crust overhang and crimp to the edge of the pie plate. Poke holes all over the bottom of the crust with a fork. No need for pie weights.
Chill again. To optimize results and to prevent shrinking, refrigerate the shaped crust for another 15–30 minutes.
Blind bake the crust. Preheat your oven to 375 F and bake for 15 mins.
Egg wash and finish baking. Pull the crust out of the oven and brush a beaten egg (you won’t need the entire egg)over the crust to seal it and return the pie plate to the oven and bake for an additional 5-6 mins minutes, or until the crust is a uniformly golden-brown and looks dry. Save the rest of the egg for an omelette :)
Let the crust cool completely.
Chocolate silk filling:
Chop chocolate. Chop into fine pieces.
Separate egg yolks. Separate 4 egg yolks from egg whites and add the yolks to a medium mixing bowl (save the egg whites for the meringue).
Whip egg yolks and sugar. Add sugar to the egg yolks and beat with an electric mixer moving up to high speed until pale and thickened, about 3 minutes.
Heat 3/4 cup (177 mL) cream. Pour 3/4 cup of the heavy cream into a medium saucepan (on low heat) or in the microwave, until the cream is hot to the touch but not scalding.
Temper yolks with cream mixture. While whisking the yolk mixture slowly pour in heated cream to temper them. Then pour egg yolk and cream mixture back into your saucepan and whisk rapidly on low heat until a food thermometer has reached 160 F (71 C).
Melt in chocolate. Remove the tempered yolk/cream mixture from the stove and pour it through a fine mesh sieve into a clean medium bowl to remove any potential lumps (there should be very little). Then, while the yolk mixture is still hot from the stove add in chocolate, vanilla and salt and stir until melted.
Let cool to room temp: Cover and chill until it reaches room temperature (~70 F or 21 C).
Whip cold heavy cream and fold into chocolate mixture. In another bowl whip the remaining cold heavy cream (~1 cup) until stiff peaks form. Fold the whipped cream into cooled (room temp) chocolate mixture until combined.
Transfer chocolate filling to pie crust. Transfer the luscious chocolate filling to the pie crust and use an offset spatula, regular spatula, or butter knife to disperse the filling evenly throughout the crust and roughly smooth the top.
Refrigerate. Refrigerate the pie for 30-40 minutes before adding the meringue on top.
Italian Meringue:
Pour the four egg whites (120 g), at room temperature, into the bowl of your stand mixer.
In a medium sauce pan (fitted with a candy thermometer or temperature gun nearby) heat up the sugar and water until it reaches 118 C (245 F). Periodically mix the syrup to make sure the sugar is dispersed and completely melted. At this point you can throw in a pinch of salt.
When the sugar syrup is just about to come to temperature start whisking your eggs at medium speed until a little foamy.
Slowly pour the hot syrup on the side of the bowl while still whisking the egg whites. Once the syrup is completely poured in, start whisking at high speed for ~5 minutes. Whisk until the meringue is shiny and has formed very stiff peaks.
Pipe the meringue in a free form pattern across the top of the pie to your liking.
Optionally toast the top of the meringue peaks with a blow torch.
Refrigerate the pie. Meringue looks nice for roughly a day before it starts to weep. You can prevent this by adding 1/2 teaspoon of cream of tartar. I like to go sans cream of tartar unless you need the pie to look nice for more than a day.